The grid cable tray has various shapes and flexible installation, which is very popular. The grid cable tray is also divided into wall leaning series installation, hanging series installation and support series installation. What I want to share with you today is the installation of hanging series.
We take the grid bridge and accessories of Xinshangpin Technology as an example. First, we need to determine which type of accessories we use. At present, there are the following types: C-shaped steel cross arm, several types of cross arm, M-shaped cross arm, profile hanging combination, grid hook, 50 grid hanging parts. After determining the parts, we will see which specific products are used for this component.
1.C CHANNEL BAR
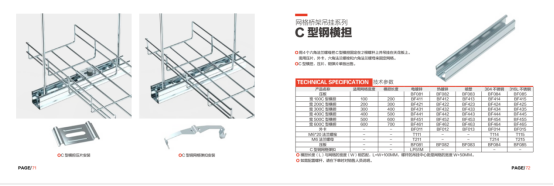
C CHANNEL BAR
When selecting and purchasing the C-shaped steel cross arm, it must be noted that it is different from other installation accessories, and its cross arm length is the width of the grid+100mm. Many people have to ask, what about the center distance of the suspension? The grid width is+50mm. If our grid width is 100mm, then the center distance is 150mm. Of course, you can also adjust the center distance according to your actual situation. For the installation of C-shaped steel cross arm, the flange nut is used to connect the screw with the cross arm, and the expansion connection between the screw and the ceiling. The grid is directly connected with the cross arm and only needs to be fixed by pressing.
2.Ω BRACKET(ROOF)
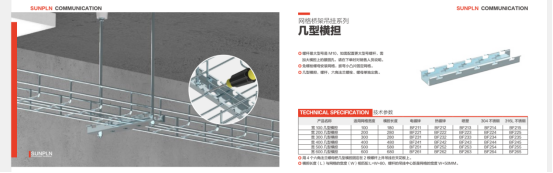
Ω BRACKET(ROOF)
This model is installed without bolts. It is different from the C-shaped steel cross arm above. The upper part needs to be fixed by pressing plates. For this model, it can be fixed by directly pressing the convex plates. Of course, it should be noted that the length of this cross arm is the grid width+80mm. The center distance is constant, that is, it is based on the grid width+50mm. During installation, it is only necessary to use flange nuts to connect with several types of cross arms, and suspenders to connect with the ceiling.
3.M BRACKET(SUPPORT)
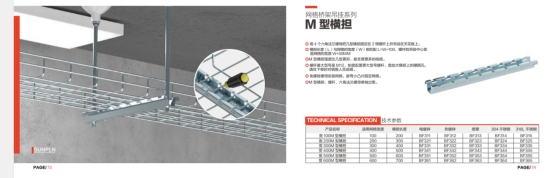
M BRACKET(SUPPORT)
12# ANGLE SUPPORT
The M-type cross arm is recommended for use, because its supporting force is better than that of several types of cross arms, and it can support more cables. It is suitable for the environment where many cables are required for on-site installation. Note that the length of this cross arm is grid width+100mm. Whether the center distance is constant or the grid width is+50mm. During installation, nuts are also used to connect with cross arms, and suspenders are used to connect with the ceiling.
4. Profile hanging combination
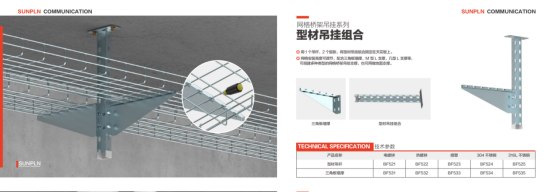
If the profile is hung, the installation is flexible, because in addition to the hanging, the triangle plate support can be replaced, which can be replaced by several types of supports, L-shaped supports, etc. It is more practical in combination. First, the expansion handle hanger is used to connect with the ceiling, and then the triangle plate is connected with the hanger with bolts and nuts. The height can also be adjusted during installation, which is convenient. It is also suitable for different environments and can also be used as ground support.
5. Mesh hook
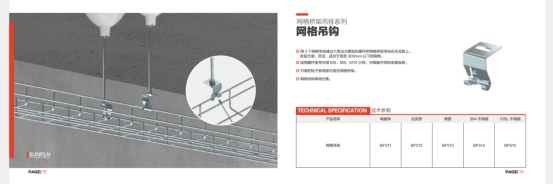
M14 THREADED RODE
There are restrictions on the use of grid hooks, because they are applicable to grid bridges with a width of less than 300. However, the installation is very convenient. Just bend the hook to fix the grid, isn't it convenient??
6. 50 grid hanger
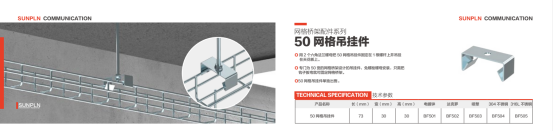
BRACKET(SUPPORT)
50 grid hanger, as the name implies, is specially prepared for the 50mm wide grid. Only one screw is needed, and no bolts and nuts are needed. Just bend the hanger to fix the grid. It is the same as the grid hook above, but it is dedicated to the 50mm grid. It's very convenient!
After talking about so many ways of hanging and installing, I wonder which one of the new SUNPLN technologies is most popular? Of course, it is also nec
essary to select the one that is suitable for you according to the actual situation of the site construction, with reference to environmental factors, cost budget, installation convenience, etc.


 INICIO